What is Freediving? The Complete Beginner's Guide
Your complete guide to freediving — what it is, how your body adapts, the different disciplines, safety essentials, and how to get started.
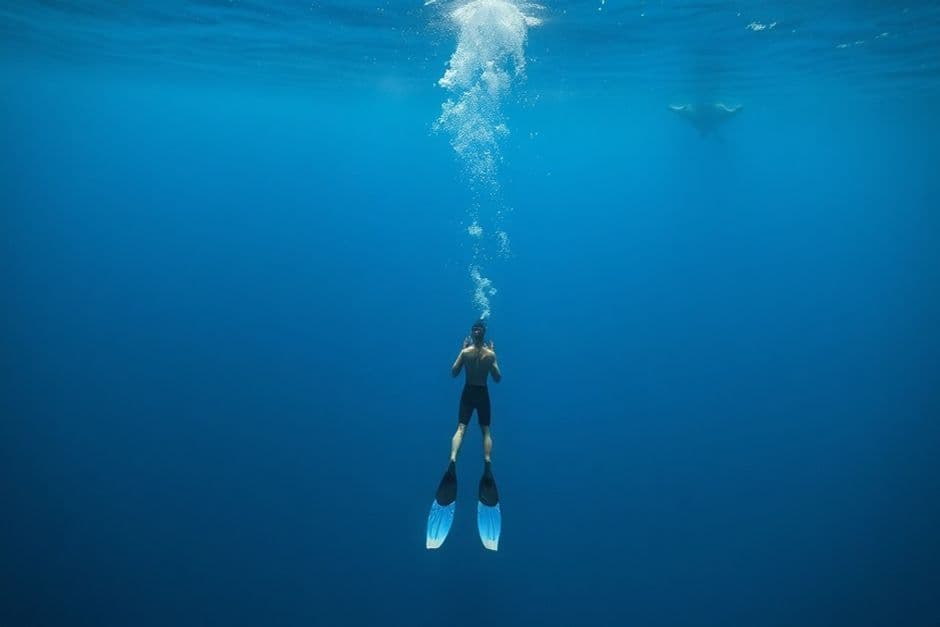
What is Freediving?
Freediving is diving underwater on a single breath, without scuba equipment. Also called breath-hold diving or apnea, it's one of the oldest and most natural ways humans explore the underwater world.
Unlike scuba diving which relies on tanks and regulators, freediving uses only the air in your lungs. It combines physical conditioning, mental preparation, and technical skill to extend your time underwater.
Modern freediving ranges from recreational reef exploration (3-20 metres) to competitive athletes reaching depths over 100 metres or holding their breath for 10+ minutes. Most people start with pool training and shallow open water dives.
Why People Freedive
Natural connection — experience the ocean as humans have for thousands of years
Mental clarity — develop focus, relaxation, and mindfulness through breath control
Physical fitness — improve cardiovascular health, lung capacity, and overall conditioning
Environmental awareness — gain deeper appreciation for marine ecosystems
Personal challenge — safely explore and expand your physical and mental limits
Community — join a global community of ocean enthusiasts
Common Misconceptions
Many people associate freediving with extreme depth or danger. In reality, most recreational freediving happens in shallow water (3-15 metres), and proper training emphasises safety, gradual progression, and never diving alone. Quality instruction focuses on technique and relaxation — not just pushing limits.
Freediving vs Scuba Diving
Both are ways to explore underwater, but they're fundamentally different experiences.
Key Differences
Equipment: Scuba uses tanks, regulators, BCDs. Freediving uses just mask, fins, and wetsuit.
Duration: Scuba dives last 30-60+ minutes. Freediving dives last 1-4 minutes per descent.
Depth: Recreational scuba limit is 40m. Freediving ranges from shallow to 100m+ for elites.
Training time: Scuba certification takes 3-4 days. Basic freediving certification takes 2 days.
Cost: Scuba gear costs $1,500-3,000+. Freediving gear costs $300-800.
Experience: Scuba is observational and relaxed. Freediving is more immersive and athletic.
When to Choose Freediving
You want a more natural, minimalist approach
You're interested in the meditative aspects of breath-holding
You want lower equipment costs and maintenance
You prefer shorter, more dynamic underwater experiences
You're interested in spearfishing or underwater photography
When to Choose Scuba
You want extended bottom time for exploration
You're diving wrecks or deep reefs that require long observation
You prefer a more relaxed, less athletic experience
You have difficulty with breath-holding or equalization
Many divers enjoy both — they're complementary rather than competing activities.
How Your Body Adapts: The Mammalian Dive Reflex
Humans have a built-in physiological response to water immersion called the mammalian dive reflex. This ancient survival mechanism helps your body conserve oxygen underwater.
What Happens When You Dive
Bradycardia — Your heart rate slows by 10-25%, reducing oxygen consumption. This is triggered by cold water on your face.
Peripheral vasoconstriction — Blood vessels in your extremities constrict, directing oxygen-rich blood to vital organs (heart, brain, lungs).
Blood shift — At depth, blood plasma moves into your chest cavity to protect your lungs from compression. This allows diving to depths that would otherwise crush your lungs.
Spleen contraction — Your spleen releases stored red blood cells, increasing oxygen-carrying capacity by up to 10%.
Can You Train This Response?
Yes. Regular freediving practice strengthens these adaptations. Experienced freedivers show more pronounced dive reflexes than beginners. This is why progression should be gradual — your body needs time to adapt.
Understanding Oxygen and CO2
The urge to breathe comes from rising CO2 levels, not falling oxygen. This is important for safety.
Contractions — diaphragm spasms during a breath-hold indicate rising CO2. They're uncomfortable but not dangerous.
Hypoxia — dangerously low oxygen. Can cause blackout without warning. This is why you never dive alone.
Hyperventilation danger — excessive breathing before a dive lowers CO2 without adding oxygen, delaying the urge to breathe and increasing blackout risk.
Freediving Disciplines
Freediving is divided into pool disciplines (distance/time) and depth disciplines. Each develops different skills.
Pool Disciplines
Static Apnea (STA)
Holding your breath while floating motionless. Pure breath-hold training. Beginner goals: 2-3 minutes. Advanced: 5+ minutes. Always with supervision.
Dynamic with Fins (DYN)
Swimming horizontally underwater with fins. Tests technique and efficiency. Beginner goals: 50m. Advanced: 150m+.
Dynamic No Fins (DNF)
Swimming horizontally using only breaststroke movements. The most physically demanding pool discipline. Beginner goals: 25-40m.
Depth Disciplines
Constant Weight with Fins (CWT)
The most popular depth discipline. Descend and ascend using fins, carrying the same weight throughout. This is what most recreational freedivers practise.
Constant Weight No Fins (CNF)
Descend and ascend using only arm and leg movements. The purest and most challenging depth discipline.
Free Immersion (FIM)
Pull yourself down and up a rope. Excellent for learning depth sensations and equalization. Often the first depth discipline taught.
Variable Weight & No Limits
Historical/extreme disciplines using weighted sleds. No longer commonly practised due to safety concerns.
Essential Techniques
Equalization
Balancing pressure in your ears and mask as you descend. Without proper equalization, you'll experience pain and potential injury.
Valsalva — pinch nose and gently blow. Simple but inefficient at depth.
Frenzel — use tongue as a piston. More efficient, works deeper. Takes practice.
Mouthfill — advanced technique for depths beyond 30m.
Never force equalization. If it hurts, ascend slightly and try again. See our equalization guide for detailed techniques.
Breathing Preparation
Proper breathing before a dive improves oxygen saturation and promotes relaxation.
Relaxation breathing — slow, deep breaths (4 seconds in, 8 seconds out) for 2-3 minutes before diving
Final breath — deep diaphragmatic breath, then "packing" additional air using the throat
Never hyperventilate — rapid deep breathing is dangerous and increases blackout risk
See our breathing techniques guide for detailed protocols.
Relaxation
Tension burns oxygen. The best freedivers are completely relaxed. Training includes:
Progressive muscle relaxation
Visualization and mental rehearsal
Meditation and mindfulness practice
Learning to accept discomfort without tension
Safety Essentials
Safety is the foundation of freediving. Every technique and progression builds on proper safety protocols.
Rule #1: Never Dive Alone
This applies to ALL freediving — pool, shallow water, or depth. Blackout can happen without warning, even in shallow water. A buddy watching from the surface can save your life.
One person dives while the other watches from the surface
Constant visual contact throughout the dive
Safety diver meets ascending freediver at 10m depth
Both divers trained in rescue techniques
Understanding Blackout
Hypoxic blackout (or shallow water blackout) is the most serious risk in freediving. It occurs when brain oxygen drops too low.
Often happens during ascent when pressure decreases
Can occur without warning — no gasping or struggle
Risk increases with hyperventilation, fatigue, or pushing limits
Prevented by: conservative limits, proper buddy system, no hyperventilation
Surface Protocol
After every dive, perform "recovery breathing" and stay at the surface for observation:
Hook breathe: sharp exhale, passive inhale, hold 3 seconds. Repeat 3 times.
Hold onto float or buddy for 30 seconds
Signal "I'm OK" to buddy
Watch for signs of LMC (loss of motor control) or blackout in yourself and others
For comprehensive safety information, see our buddy system guide and safety protocols article.
Getting Started
Do You Need a Course?
When choosing your instructor, remember that credentials alone don't guarantee quality. Learn how to evaluate a freediving instructor before committing to a course — it's one of the most important decisions you'll make in your freediving journey.
Yes. Unlike swimming or snorkelling, freediving requires specific safety knowledge that you can't safely learn alone. A proper course teaches:
Physiology — why blackout happens and how to prevent it
Rescue skills — how to save an unconscious diver
Technique — efficient movement and equalization
Safety protocols — buddy system, surface procedures
Certification Agencies
Major freediving certification bodies:
AIDA — the original freediving agency. Strong safety focus. AIDA 2 is the standard recreational certification.
SSI Freediving — part of the SSI scuba network. Good digital learning materials.
PADI Freediver — the scuba giant's freediving programme. Widely available.
Molchanovs — founded by competitive champion. Popular with serious athletes.
All teach similar core skills. Choose based on instructor quality, not just agency. See our certification comparison and Melbourne course guide for details.
What to Expect in Your First Course
A typical beginner course (2 days) includes:
Theory — physiology, physics, safety, equipment (3-4 hours)
Pool session — breathing, static holds, dynamic swimming, rescue practice
Open water — depth dives to 10-20m, buddy protocols
Assessment — demonstrate skills and knowledge
Read our first course expectations guide for detailed preparation tips.
Essential Equipment
Freediving requires minimal gear compared to scuba. Start with these basics:
Mask
Low volume — smaller air space means less equalization needed
Comfortable seal — no leaks or pressure points
Budget: $40-150
Fins
Long blade — freediving fins are longer than scuba/snorkel fins for efficiency
Full foot pocket — snug fit for power transfer
Start with plastic blades, upgrade to fibreglass/carbon later
Budget: $100-400 (plastic), $300-800 (composite)
Wetsuit
Smooth skin exterior — reduces drag (unlike scuba wetsuits)
Thickness — 3mm for warm water, 5mm for Melbourne (14-18°C)
Two-piece (jacket + pants) preferred for better fit
Budget: $200-600
Weight Belt
Rubber weight belt with quick-release buckle
Weight amount varies by wetsuit thickness and body composition
Your instructor will help determine correct weighting
Budget: $30-80
Safety Gear
Dive buoy/float — surface marker for boat traffic
Dive computer or watch — tracks depth and time
Whistle — emergency signalling
Budget: $50-300 depending on computer choice
Choosing a Freediving Instructor
Instructor quality matters more than certification agency. Here's what to look for:
Green Flags
Current certification — verify with the issuing agency
Teaching experience — ask how many students they've certified
Safety emphasis — they talk about safety more than depth
Reasonable ratios — max 4 students per instructor for open water
Community reputation — ask at local dive shops, online forums
Insurance — professional liability coverage
Red Flags
Reluctant to show credentials
Rushing through safety content
Encouraging hyperventilation
Pressure to push beyond comfort zone
Large groups with minimal supervision
Focus on depth achievements over technique
Questions to Ask
"What's your instructor certification level and when did you qualify?"
"What safety equipment do you provide?"
"What's the maximum student-to-instructor ratio?"
"Can I speak to previous students?"
For detailed guidance on evaluating training quality, see our Melbourne courses comparison.
Where to Freedive in Melbourne
Melbourne and Victoria offer excellent freediving opportunities:
Beginner-Friendly Sites
Portsea Pier — sheltered, 6m max, weedy seadragons
Blairgowrie Pier — calm, 7m max, incredible nudibranchs
Rye Pier — easy access, underwater trail
Depth Training
Kilsby Sinkhole (SA) — 40m+ visibility, freshwater, 5hr drive. The best depth training site in Australia.
Lake Purrumbete — 60m depth, 2hr drive, used by Melbourne freedivers for depth progression
Pool Training
MSAC (Melbourne Sports & Aquatic Centre) — heated pool, used by freediving schools for courses
Explore all 12 sites with GPS coordinates in our interactive dive sites guide.
Your Next Steps
Ready to start your freediving journey? Here's how to proceed:
1. Read our guides — start with first course expectations
2. Research instructors — use our Melbourne guide to find quality training
3. Book a beginner course — AIDA 2 or equivalent is the standard starting point
4. Get basic gear — your instructor can advise on mask and fin selection
5. Join the community — find dive buddies for ongoing practice
Freediving is a journey, not a destination. Take your time, prioritise safety, and enjoy every breath.
Have questions about freediving? Contact us or explore our blog for more guides.
Getting Started — Complete Series
- 1What is Freediving? The Complete Beginner's Guide
- 2Why Do People Freedive? The Psychology and Joy Behind Breath-Hold Diving
- 3Freediving Disciplines Explained: Pool, Depth & Everything In Between
- 4Freediving vs Scuba Diving: Key Differences Explained
- 5Beyond the Breath: How Freediving is Used Around the World